Vr Mapping |
ON-LINE REFERENCE DOCUMENTATION CARDINAL SYSTEMS, LLC |
Import, Interior Orientations
Type: Utility accessed from various models
All images must have interior orientations before the stereo model can be set.
For digital images (including RPC satellite images) Interior Orientation is automatic. In Vr Model Set, Air Trig, and Vr Ortho it is done as soon as an image is added to a project. In Vr Two Orientation (which only exits now for legacy support) it accomplished using the batch import command (immediately below).
Film image interior orientations can be imported following the direction below.
Interior Orientations – Batch (IntBat)

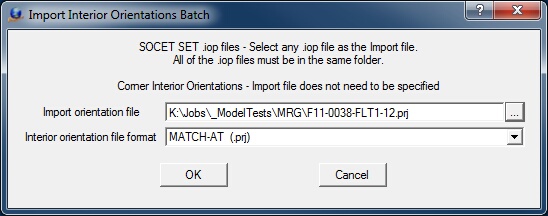
The Import Interior Orientations in Batch dialog box
Import orientation file
Defines the ASCII file that contains the interior orientation measurements. The user must know the correct file for the import format. When importing Socket Set or Orima IOP files any single IOP file may be selected and all IOP files in the same folder will be used.
Interior orientation file format
Specifies the format of the input interior orientation file.
| • | ISAT – The ISAT “photo” file extracts interior orientation measurements. |
| • | Orima – The Orima format uses .iop files. Each image must have a corresponding .iop file which uses the same name as the image but with an .iop file name extension. |
| • | Corner Interior Orientation – When using images in which the camera has not been calibrated or when using images that do not have fiducials the Corner Interior Orientation to establish a generic interior orientation. When using this format the Import orientation file parameter above does not need to be defined. |
Depending on the Interior Orientation File Format selected, one or more additional dialog boxes may appear requesting more information about the input format. One of these dialog boxes may request information about the Photo Name Format. The Photo Name Format dialog box defines the format for decoding the strip number and photo number from and image file name.
If ISAT is selected as the Interior Orientation File Format, the following dialog box will display.

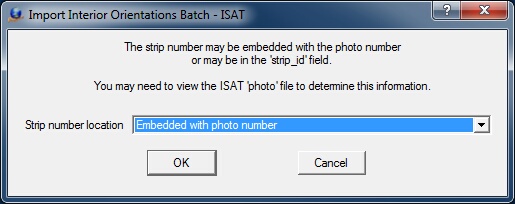
The ISAT Strip Number Location dialog box. Displayed when importing ISAT exterior orientations.
Strip number location
There are two possible locations for the strip number in the ISAT photo file.
| • | Embedded with the photo number – The strip number is part of the photo name following the ‘photo_parameters’ keyword. For example, the record: |
begin photo_parameters 205 strip_id 2
would assume the strip number and photo number are included in the 205 field. The 2 after the strip_id would be ignored. If the number of strip characters were "1" and the number of photo characters were "2", then strip 2, photo 5 would be decoded from the 205 field.
| • | After the ‘strip_id’ keyword – The strip number follows the ‘strip_id’ keyword, which is on the same record as the ‘photo_parameters’ keyword. For example, the record |
begin photo_parameters 101 strip_id 3
would assume the photo number as 101 and the strip number as 3.
Selecting Images to Orient
The following dialog box is displayed before importing begins, allowing the user to select the images to orient. By default all images are selected.

The selection of models for import dialog
After each interior orientation is complete, the results of the import are placed into the information dialog box.

The import exterior orientations information box